Overview
In order to build my front-end / development skills, I set a goal for myself to build my portfolio from scratch on a personally hosted domain, as opposed to on a website development platform like Google Sites or Wix. This would mean I would have to do significantly more work, as I would have to code all of the buttons, images, and styling myself, but I knew that this would give me valuable experience that would be useful in my future computer science career.
The SMART Process
A SMART Goal consists of five parts:
Specific: The goal has to be specific, not vauge or too broad. My goal of building just my portfolio was very specific and focused, so it passes this category.
Measurable: The goal has to have a measurable end condition, or a point where you know you’ve completed this. For me, this would be when I submitted my portfolio on Canvas.
Achievable: The goal has to be realistic enough to be actually attainable. Although I knew my goal would be hard, I felt confident that I could do it.
Relevant: The goal has to be relevant to what you want to achieve. Personally, I felt that my goal would be a great way to build experience in computer science for my career.
Time-Bound: The goal has to have a time constraint. For my goal, the time constraint was when the portfolio assigment locked (Jan. 8).
Steps to Success
I had five significant milestones when working towards this goal:
Step 1: Gained practice in web development by making a simple game in HTML (a website coding language). This served to teach me basic website skills that I could use for my portfolio.
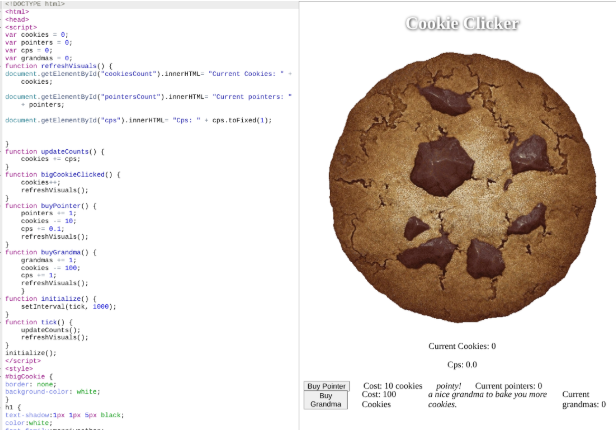
Above: screenshot of basic game. This was meant to be a basic version of the popular game Cookie Clicker.
Step 2: Researched ways to acquire a domain to host a website for free, eventually settling on Github Pages, which is a platform hosted by Github that lets you host a custom-coded website for free.
Step 3: Set up the link to my website and applied a style template to the home page. I used the Cayman theme to create a colored header at the top of the website with my name, as well as handle basic formatting for me.
Step 4: Added all of the required pages to my site and put placeholders where the content would later be. I also clickable links to the bottom of all of my pages so you could navigate the website easily.
Step 5: Filled the pages with the various parts parts of my portfolio, including images and text. This was the most time-consuming part of the process, as I had to manually embed all of the images and videos in the website.
// example of the code needed to embed a video. this code was used to embed my Networking QA video into its corresponding page.
<a href="https://drive.google.com/file/d/1KB8KrzlIRNzFmmeMJO2SLTG8Nje-6We2/view"> <img src="https://www.biblecenterchurch.com/wp-content/uploads/2018/10/video-placeholder-4453_1080x675.png" width="300"> </a>
Reflection and Final Thoughts
I think that working towards this goal was a very productive exercise in web development. I learned a lot, both about HTML programming and how to host a website. I had to figure out how to design, code, and implement the website all by myself, which I think is an impressive feat. I hope to embark on similar projects in the future, and I might even use this portfolio in my future career.
About Me | Job Opening | Potential Pathway Timeline | Networking QA Experience | Personal Blog | Home | Smart Goal